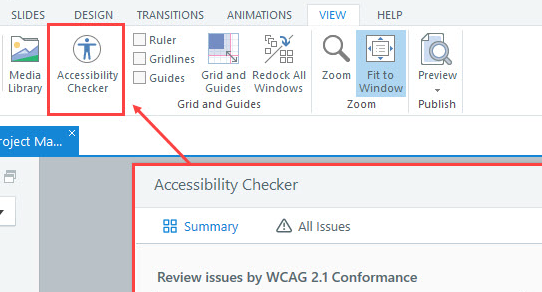
It’s been an exciting summer for e-learning developers who author courses in Articulate Storyline! Update 100 rolled out a number of new exciting features, including one of our favorites, the Accessibility Checker. Joined by Leslie McKerchie, Accessibility Program Manager at Articulate, we recently hosted a webinar highlighting this amazing tool, and you can access the recording in our webinar archives.
We’ve picked our five favorite questions from the webinar to show you how to make your e-learning more accessible, because as Leslie said, “Accessible design is good learning design.”

Question 1
“Is it realistic to aim for zero accessibility issues?”
Let’s face it, many of us strive for that gold-star standard, even in our first drafts. You might want to see “0 issues found” when opening the Accessibility Checker, but accessibility isn’t a box to check or a final score to reach. Course authors have an ongoing process of decision-making, iteration, and testing.
Storyline is a flexible, robust authoring tool. And while we recommend certain best practices, there isn’t a one-size-fits-all approach to development. Content complexity, design decisions, and chosen functionality can significantly impact accessibility.
Developing a Level 1 course with zero issues may be simple, but you’ll need to make decisions that require critical thinking for Level 3 or 4 design. Instead of thinking of the Accessibility Checker as a test to be aced, think of it as a tool that supports you in creating more inclusive e-learning experiences.
The Accessibility Checker should be used to support your design process, not to serve as a final verdict. It highlights some common accessibility issues but doesn’t (and can’t) catch everything. Articulate states:
While the accessibility checker offers a practical starting point, no automated tool can guarantee full compliance and conformance with accessibility guidelines. For the most complete results, pair the accessibility checker with manual testing.”
Note: Stay tuned for a future blog about manual testing considerations!
Question 2
“Should I run the Accessibility Checker once the course has been fully developed or should I check as I go?”
Technically, you could do either. The Accessibility Checker runs automatically in the background as you create or edit your course, and you can access it easily from the status bar or the View tab.
Consulting the checker as you go is beneficial because it allows for quicker and easier fixes as you develop, preventing a large backlog of changes right before publishing. This approach also helps you develop good accessibility habits from the start, reducing future errors. However, if you prefer to wait, you can absolutely run the checker as a part of your final review before publishing. Just be aware that a larger number of issues will naturally require more time to resolve.

Tip: Creating a QA Checklist helps establish good habits, reinforce best practices, and prevent issues when developing accessible courses.
Question 3
“The Accessibility Checker identified an issue with an image not having alt text. How do I decide which images are decorative and which ones need alt text?”
In our Creating Accessible E-Learning training, Elizabeth Kuhlmann encourages developers to think of images as fitting into three categories: Decorative, Simple, and Complex.
- The purpose of decorative images is to increase the visual appeal of the course. This often includes shapes, icons, and sometimes stock photography. Decorative imagery does not require alt text, and it should be removed from the slide’s Focus Order.
- Simple images support the course content and can be easily described in 150 characters or less–the recommended length for alt text. Photos, illustrations, and custom graphics are examples of simple images. Whether they need alternative text or to be included in the slide’s Focus Order depends on their intended purpose.
- Complex images such as charts, graphs, infographics, and screenshots should include alt text and may also require longer image descriptions to relay their full meaning.
If you have trouble determining whether an image is decorative, the W3C Web Accessibility Initiative alt Decision Tree is a handy tool for helping you decide what does or does not need alt text.
Question 4
“Many of my reported errors are related to Text Styles. What does that mean?”
Accessible Text Styles let developers assign semantic formatting to text-based elements, embedding these details directly into a course’s source code. This feature is crucial for screen reader users, as it allows their assistive technology to identify and relay text hierarchy and key elements like headings, paragraphs, and hyperlinks. This allows the learner to distinguish the text’s structure in the same way a sighted person would by simply glancing at the slide.
Consider this example slide.

Image Description: Screenshot of a slide that points out how we’re drawn to reading the bold, large title text at the top first, followed by the smaller subtitle. Then, we’ll likely notice the bold hyperlink on the right next, and read that paragraph. The small, dense text at the bottom is what we’ll likely read last.
Tip: Accessibility isn’t the only reason to use this feature! Customizing Text Styles at the beginning of your project and applying them as you develop helps prevent accessibility errors while simultaneously creating a more consistent visual experience throughout the course.
Question 5
“Is the Accessibility Checker available in Rise 360?”
Currently, the Accessibility Checker is only available in Storyline. But the good news is that many accessibility considerations you might address manually in Storyline–semantic formatting and focus order, for example–are built into Rise by default.
A common Rise accessibility mistake occurs when developers use blocks that aren’t accessible to all learners. Articulate clearly defines which blocks are fully accessible, mostly accessible, and currently inaccessible in their knowledge base article Rise 360: Choosing Accessible Components to Create Online Learning. Consulting this list prior to development reminds you which blocks to avoid, allowing you to focus on other accessibility considerations such as color contrast and alt text. 
Because Rise is frequently updated, be sure to check the Articulate 360 Feature Roadmap for projected new features. You can also submit a Feature Request to suggest this and other product enhancements.
Summary
Ultimately, the Accessibility Checker is a powerful ally in creating inclusive e-learning. By integrating it into your workflow, understanding its capabilities, and combining it with ongoing best practices, you’ll be well on your way to building accessible courses for all learners. As technology evolves, remember to stay curious and continue to champion accessibility in your work!
What’s your experience using the new Accessibility Checker? Feel free to leave a comment or contact us to share your approach!
And, if you enjoyed this Q&A from the webinar, make sure you also check out the full webinar recording and our Webinar Archive for even more recordings.
Now, Here Are Some Additional Resources!
For more on this topic, check out the following resources from Articulate and The Articulate Trainer blog:
Rise 360: Choosing Accessible Components to Create Online Learning
Storyline 360: Accessible Semantic Formatting
Storyline 360: Accessible Text Styles
Storyline 360: Improving Experiences With the Accessibility Checker
Storyline 360: Using Text Styles
What is Focus Order in Accessible e-Learning?
What Should I Include in My E-Learning QA Checklist?
Happy developing!

~ Raye
Leave a Reply