You may already know you can create cool content in Articulate Storyline and pop it right into your Articulate Rise courses. But we’re often asked about the best approaches for doing so. So, we’ve gathered our favorite suggestions to address this “as heard in training” question: “What are some tips for adding Storyline blocks in Rise?” Let’s dive in!
Combining Storyline and Rise to create custom interactions is an excellent way to improve the engagement level of your courses. Since we frequently drop Storyline blocks into our own Rise courses, we’ve figured out a few key questions you should ask yourself first:
- Do I want the learner to see my Storyline player, or do I want the interaction to be as seamless as possible with the rest of the Rise course?
- Do I want to force the learner to complete the interaction before continuing?
- Do I want the interaction to automatically start playing, or do I want the learner to use a Play button?
Let’s address each of these considerations one at a time.
Turning the Storyline Player Off
If the Storyline interaction you’ve built contains multiple slides, you may want to leave your player on. This way, the navigation controls (like “Next” and “Previous” buttons) are available for the learner to easily move between slides.
On the other hand, if your interaction is a single slide, then you could go for what we call a “chromeless” experience. Let’s review two examples that illustrate the difference.
Player On
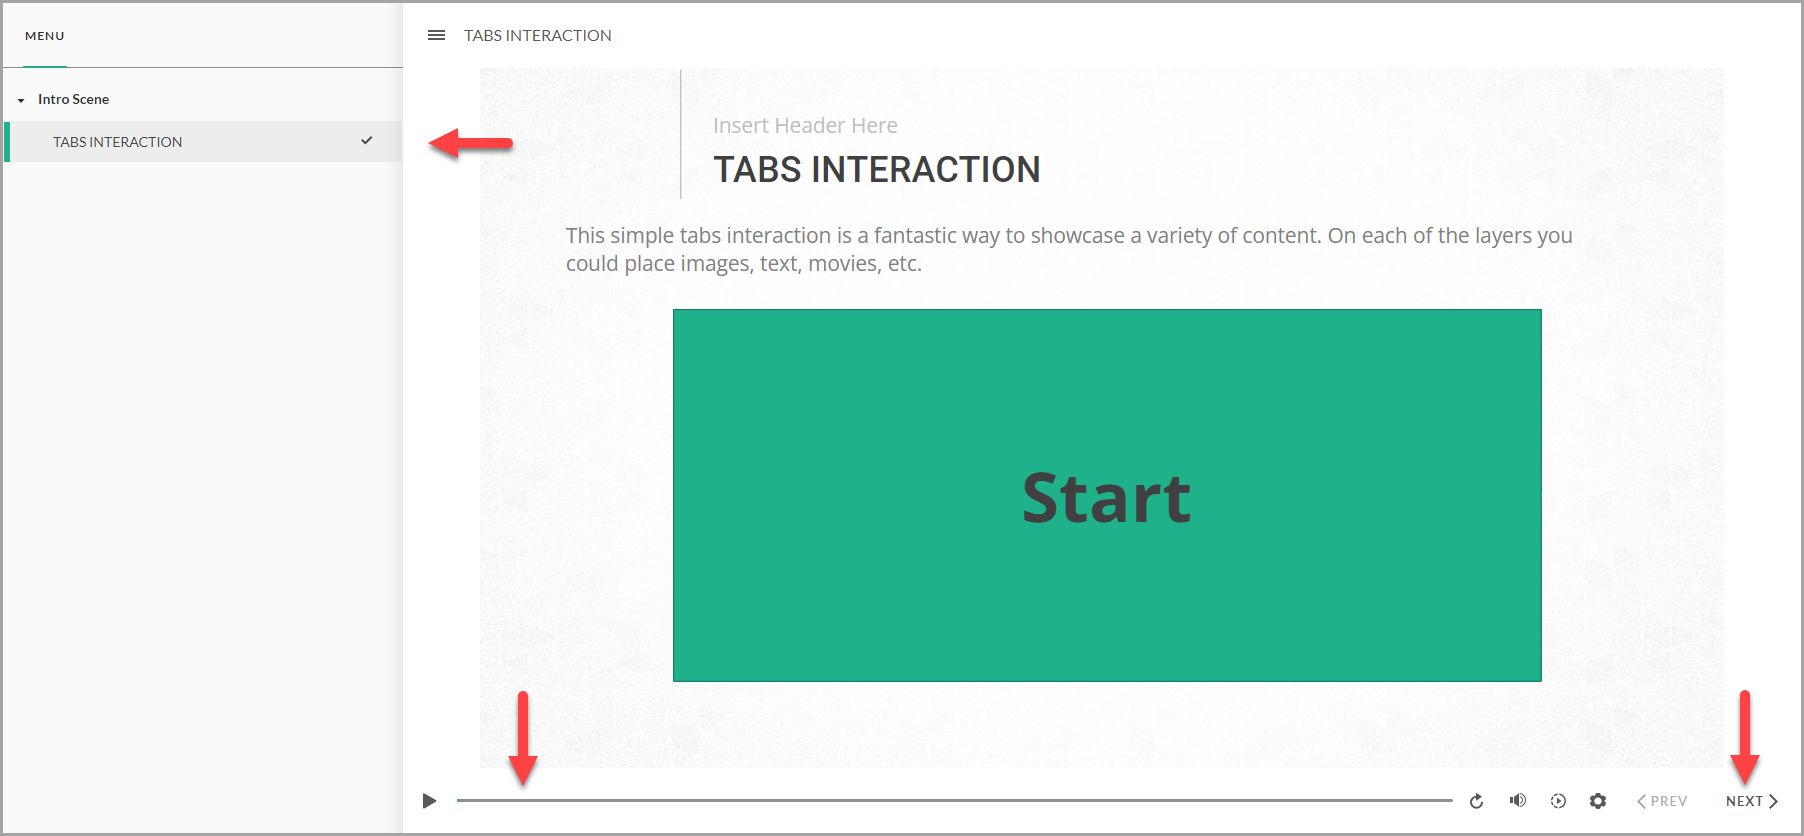 When the player is on, there’s a visible border around your interaction along with the navigation controls: like the menu, seekbar, and the Previous/Next buttons.
Player Off
 By turning the player off, the interaction is displayed without any surrounding border, navigation buttons, or visible player interface. The interaction itself takes up the maximum screen space, and looks more integrated or seamless within your Rise content.
To turn the player off, open the Player Properties window from the Home tab. Then, change the setting called Menus & Controls to Off.

From there, simply publish your Storyline course to Review 360 so it can be embedded into your Rise course.
Note: If you’d like to see the process of publishing and inserting a Storyline block, check out this video on our YouTube channel.
Forcing the Learner to Complete the Interaction
Another great thing about using Storyline blocks in Rise is that you can control when learners can move forward in the course.
In our example, we want to require that learners complete the interaction before moving on. To do this, we’ll add a Complete course trigger in Storyline, and then adjust the settings of the Continue button in Rise.
To get started, we’ll go back into the Storyline file containing our block, and add a new trigger to “Complete course” to “Completed/Passed.” The placement of this trigger can vary depending on your interaction, but you would want the trigger to happen after the learner has finished the course.
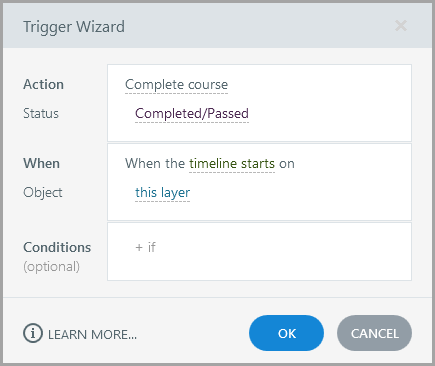 In our example, we want to ensure learners review all four buttons (when reviewing corresponding layers of information). So, we added the Complete course trigger on the fourth and final layer.
Note: To see this for yourself, download this sample file and check out the “Step 04” layer.
Next, we would republish the updated Storyline block to Review 360, and then re-add it to our Rise course. From there, we need to add a Continue button (from Block Library > Divider). Then, select the Content button (the pencil icon) of the new Continue button, and change the Completion Type setting to “Complete Block Directly Above”.
 Like magic, the Complete course trigger in the Storyline block now unlocks the Continue button when the learner gets to the final layer of the interaction.
Determine Whether the Interaction Autoplays
Another consideration when using Storyline blocks in Rise is to determine if the interaction will start automatically, or if the learner needs to press a “Play” button to start it. This often comes down to whether or not the first slide of your interaction contains audio and video, as Articulate mentions:
On desktops and laptops, Storyline blocks play automatically by design, but browser restrictions can prevent this when the first slide has audio or a video. Currently, we found that only Firefox consistently allows Storyline blocks to autoplay. Google Chrome, Microsoft Edge, and Safari sometimes don’t autoplay content. Of course, this could also change over time.”
To make sure every learner has a consistent experience, you can actually override the browser’s control and display a reliable “Play” button yourself. Let’s review both ways to handle this situation.
First Slide Doesn’t Have Media
If the first slide of your Storyline content doesn’t have audio or video, follow these steps:
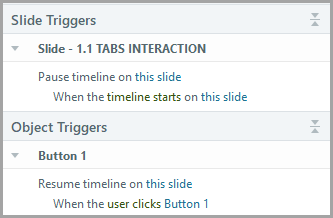
- Add a trigger that “pauses the timeline when the slide starts.”
- Next, add a “Start” or “Begin” button for learners to select.
- Then, add a final trigger that “resumes the timeline when the user selects” that button.
 Again, feel free to explore our sample file to review how we developed this functionality!
First Slide Has Media
If the first slide of your Storyline content has audio or video, some browsers might automatically add a “Play” button when you embed it in Rise. To make sure that “Play” button always shows up for your learners, here’s a trick:
- Insert a new slide right before your existing first slide.
- Make sure this new slide has no audio or video on it. It should just feature a custom “Play” button you design.
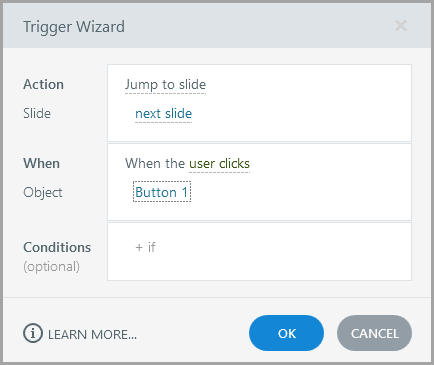
- Finally, add a trigger to that new button that takes the learner straight to your next (original) slide.
 I hope these tips give you some great new ideas for using your Storyline blocks in Rise! Got a favorite tip of your own? Please share it with us or drop it in the comments!
Want More on this Topic?
For more information on adding Storyline blocks in Rise, check out the following resources from Articulate, The Articulate Trainer blog, and our YouTube channel:
22 Creative Ways to Use Storyline Blocks in Rise 360
Here’s How Course Designers are Using Storyline Blocks in Rise #193
Inserting a Storyline 360 Block in Rise 360 (Video)
Rise 360: Making Storyline Blocks Behave Consistently
Rise 360: Use Storyline Blocks to Embed Storyline 360 Courses
Until next time,

~ John
Leave a Reply