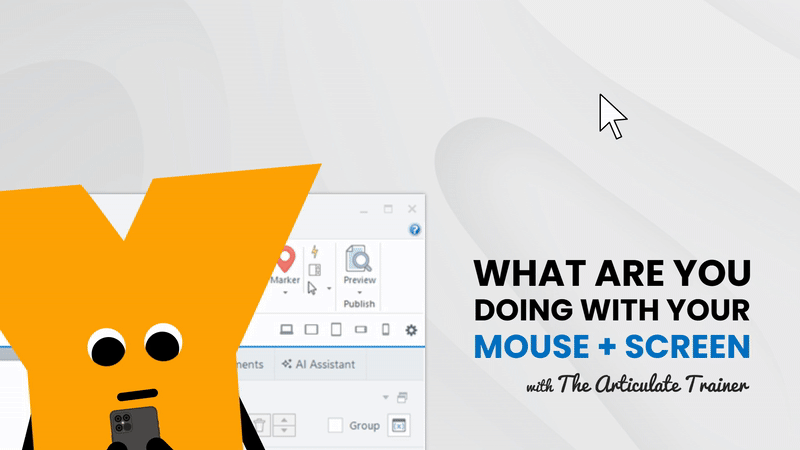
If you’ve ever attended one of our training sessions—in person or online—you’ve likely noticed that we make it a point to show you exactly where we’re clicking. You’ve probably also seen us zoom in on our screens to focus on specific areas, and even draw directly on the screen to highlight what we’re covering.
Did you know that all of these things can be accomplished using free software? Yup, it’s true! We’ll share them with you as we explore this “as heard in training” question: “What are you doing with your mouse and screen?”
Let’s Start With the Mouse!
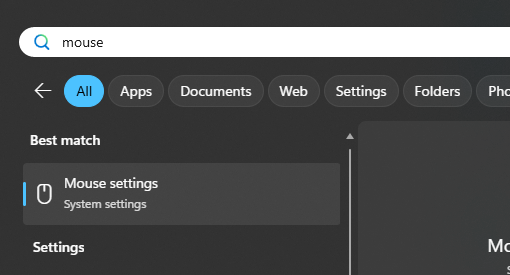
There are a few tricks we do with our mouse to make it easier for students to see the pointer. Feel free to open your mouse settings and follow along! (For Windows users, simply type “mouse” into the Start menu search bar.)
Trick 1: Change your mouse pointer to make it more visible!

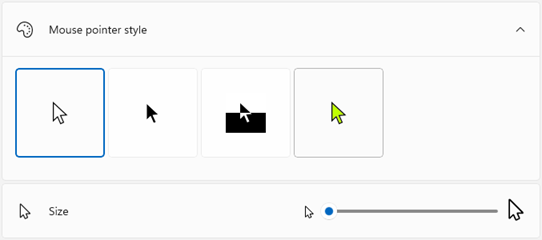
In your mouse settings, locate the section on the Mouse pointer. Making your pointer larger (using the Size slider) is an easy way to improve visibility, and while you’re there, you might even consider changing its color.
Trick 2: Indicate where your mouse pointer is located!
The same menu that allows you to change the size and color of your mouse pointer also has a helpful setting called the “Mouse indicator”. Toggle this setting to On, and when you press the Ctrl key, circles appear around your pointer. This provides a quick and clear way to show students precisely where they need to look or click. So fun!

Tip: Keep in mind that when you’re using Articulate Storyline 360’s screen recording tool, pressing the Ctrl key on your keyboard records those clicks as part of your simulation steps. To avoid this, we recommend not using or disabling the “Mouse indicator” feature while you’re recording a Storyline 360 system simulation.
Now, let’s shine a light on the next tip!
Trick 3: Spotlight your mouse pointer using Microsoft PowerToys!
Want to put even more emphasis on your mouse pointer? We recommend a free tool from Microsoft called PowerToys.
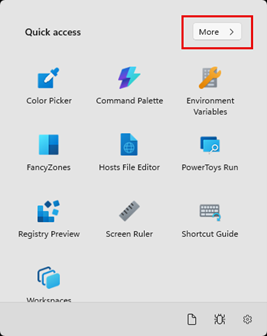
Once installed, simply open the program from your system tray and select “More” to discover all of the amazing things PowerToys can do.
Specifically, we love enabling the “Find my mouse” feature that spotlights your mouse and draws attention to its location.
By default, press the Ctrl key twice to activate the spotlight. However, you can set a custom shortcut if you prefer, especially if you’re already using Ctrl for the mouse indicator we discussed earlier.

Tip: The spotlight disappears automatically shortly after your mouse stops moving, or you can dismiss it instantly by pressing the shortcut key again.
Now that we’ve covered our mouse tricks, let’s shift our focus to drawing more attention to specific areas on the screen.
Let’s Explore ZoomIt!
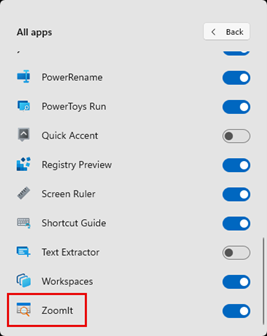 We love the ability to zoom in and draw on our screens. And, our students love it too!
The tool we use for this is called ZoomIt, which started as a standalone application and is now also included in Microsoft PowerToys.
Let’s explore how it works!
Trick 1: Zoom in!
Once ZoomIt is enabled, the default way to zoom into your screen is by pressing Ctrl + 1.

You can move around while zoomed in using your mouse. To lock the zoomed area, simply click the left mouse button. Then when you’re done, just press the Escape key to zoom back out.
Trick 2: Draw!
Beyond just zooming, another technique we use to direct attention is drawing on the screen. If you enjoy adding a splash of color, you can easily change the drawing tool’s color to red, blue, green, or yellow by pressing the R, B, G, or Y keys on your keyboard.
And, if you’d like to draw shapes, you can hold down specific keys on your keyboard while drawing. Here are our favorites:
- Ctrl = Square
- Shift = Straight Line
- Tab = Ellipse/Circle
- Ctrl + Shift = Arrow
Prefer to draw without zooming? You have that option too, simply press Ctrl + 2 (by default).

Finally, ZoomIt also lets you create a blank sketchpad: after pressing the shortcut key, press W for a white screen or K for a black screen you can draw on.
Tip: Keep in mind that your drawings won’t be saved automatically. To keep a copy, use your device’s screenshot function (such as PrintScreen).
These are just some of the powerful features ZoomIt offers. We highly encourage you to explore all the other things it can do!
Ralph Waldo Emerson said, “The secret in education lies in respecting the student.”
We feel those words are still true today, and I hope this has helped to unlock some ways you can respect your students by improving your training sessions using these free tools and features.
Please let us know if you have found these tools useful, or if you’ve stumbled upon new and interesting ways of using them!
Here Are Some Quick Links on this Topic!
For more information on these tools, check out the following resources:
Microsoft Windows – Change Mouse Settings
Microsoft PowerToys – Information and Installation
Microsoft PowerToys – Find My Mouse
Microsoft PowerToys – ZoomIt Utility
And, We Hope You’ll Join Us for Training!
Ready to unlock the full potential of Articulate 360? We’d love to see you in one of our expert-led training courses, where we’ll help you gain the skills and knowledge to create engaging and effective e-learning, whether in person or virtually!
Check us out: Training – Yukon Learning
Until next time,

~ John
Leave a Reply