So, you’ve run the Accessibility Checker in Articulate Storyline and fixed the errors…now what? While the checker is a powerful starting point, the most inclusive courses require a little extra “human” touch. To help you cross the finish line, we’ve gathered the top 5 steps you should take to ensure your content is ready for everyone. So, open up that Storyline file as we tackle this “as heard in training” question: “What else should I do after running the accessibility checker?”
Step 1: Color Contrast
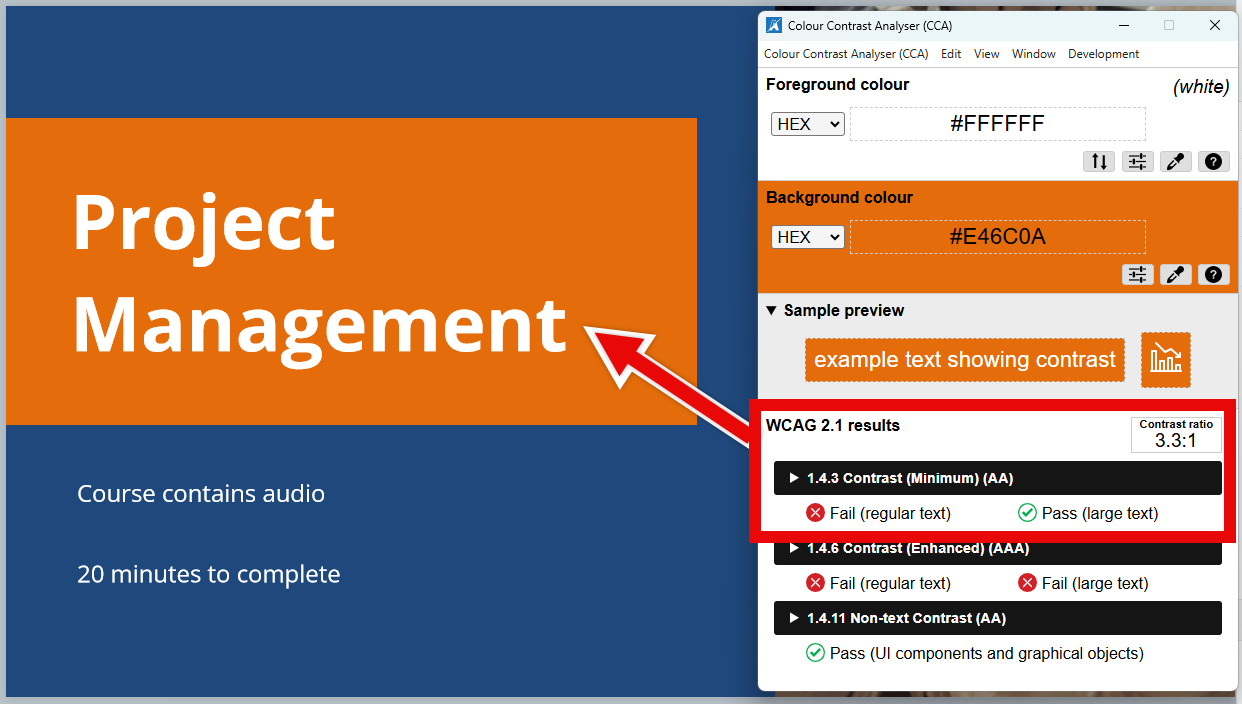
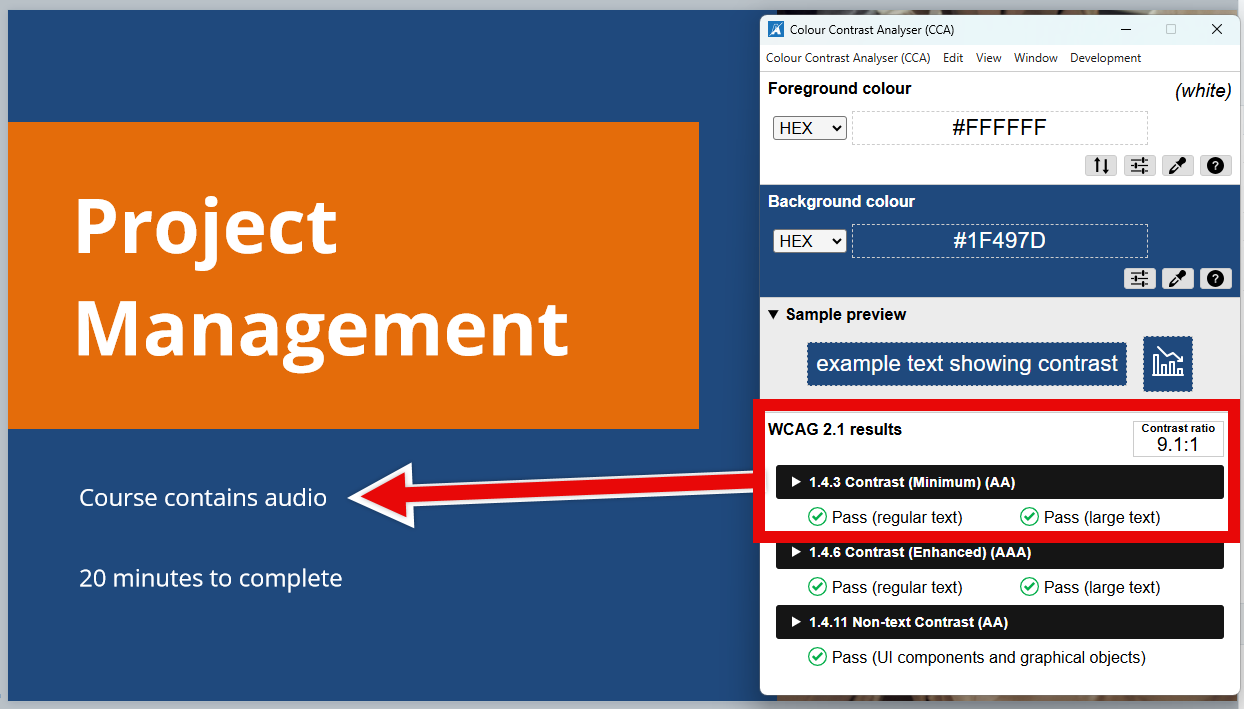
Customizing Theme Colors is one of the easiest ways to implement your organization’s brand standards while maintaining design consistency throughout your course. However, the Accessibility Checker doesn’t “see” how you’ve chosen to combine the colors, so it’s up to you to manually check!
When you’re working with large text, such as slide titles or Heading Level 1 styles, double-check that you have a contrast ratio of at least 3:1. (SC 1.4.3).
For standard text, like body paragraphs usually set to the “Normal” Text Style, you want to aim for a higher contrast ratio of at least 4.5:1.
But it’s not just text that you have to consider! Your user interface elements (like buttons, sliders, and text input fields) and any graphical objects, like the data in a chart, should have a contrast ratio of at least 3:1. (SC 1.4.11).
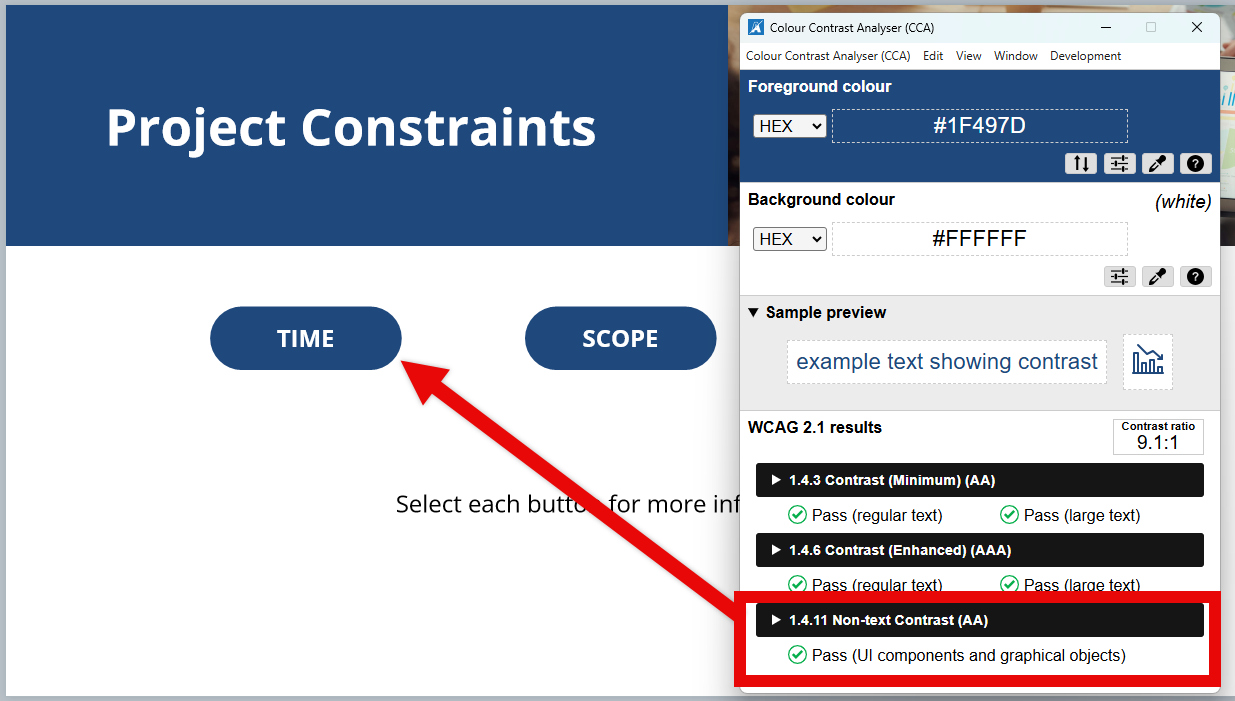
Tip: Before starting development, use this Accessible Color Palette Builder to analyze the course’s Theme Colors. It provides which combinations meet contrast standards right from the start. We always recommend testing the brand colors against black (#000000) and white (#FFFFFF), since they’re the most common text colors you’ll end up using.
Step 2: Focus (Reading) Order
Another consideration that the Accessibility Checker can’t evaluate is the intended reading order of a slide (SC 1.3.2). By default, Storyline organizes the Focus Order of the elements of your slide from the top/down and left/right.
Take this slide, for example. With the default Focus Order, the “Did you know…” message would be read by a screen reader before the slide title and content. But because that note animates in after the main content, it really should be placed at the end to match how someone viewing the screen would process the information.

Note: While the Accessibility Checker determines when an object doesn’t have alternate text, it doesn’t know which objects should or should not be included in the Focus Order. So, that choice is yours to make as well!
Step 3: Navigation Consistency
You may be thinking, “Of course we know about color contrast and focus order. You’ve written blogs about them before!” So let’s dig into a few more concepts that aren’t as commonly mentioned, starting with consistent navigation (SC 3.2.3).
 Our goal here is that the navigation options are the same throughout the course. For the most consistent slide-to-slide experience, we recommend using the Accessible Player’s built-in navigation features.
However, if you prefer using onscreen navigational elements, be sure to keep them uniform. Their appearance, location, alt text, and functionality should be identical across your entire project so your learners always know what to expect.
When it comes to interactivity, here are a few other ways you can support consistent navigation:
- Our mantra is “make it great, then duplicate!” When your buttons and their “Hover” or “Visited” states look consistent, they become instantly recognizable. There’s nothing more frustrating than going through a course and not knowing what to select or do!
- Provide clear, informative, and simple instructions for interactions, such as: “Select each icon to learn a few tips for effective project management.”
- Don’t leave your learners guessing! Whether it’s an “Exit” button on a layer, a “Continue” button on feedback layers, or custom pop-up definition layers, keeping the design and placement consistent means your learners can focus on the content instead of wondering where to click next.
Step 4: Error Prevention
It’s a common request: Subject Matter Experts often ask for questions to be submitted the second a learner selects an answer choice. On paper, it sounds great, right? One less click. But, in reality, that method doesn’t leave any room for second thoughts or accidental clicks.
When designing an accessible course, you should provide a way for the learner to confirm, correct, or reverse a choice prior to submitting important information, such as the answer to a graded quiz question (SC 3.3.4).
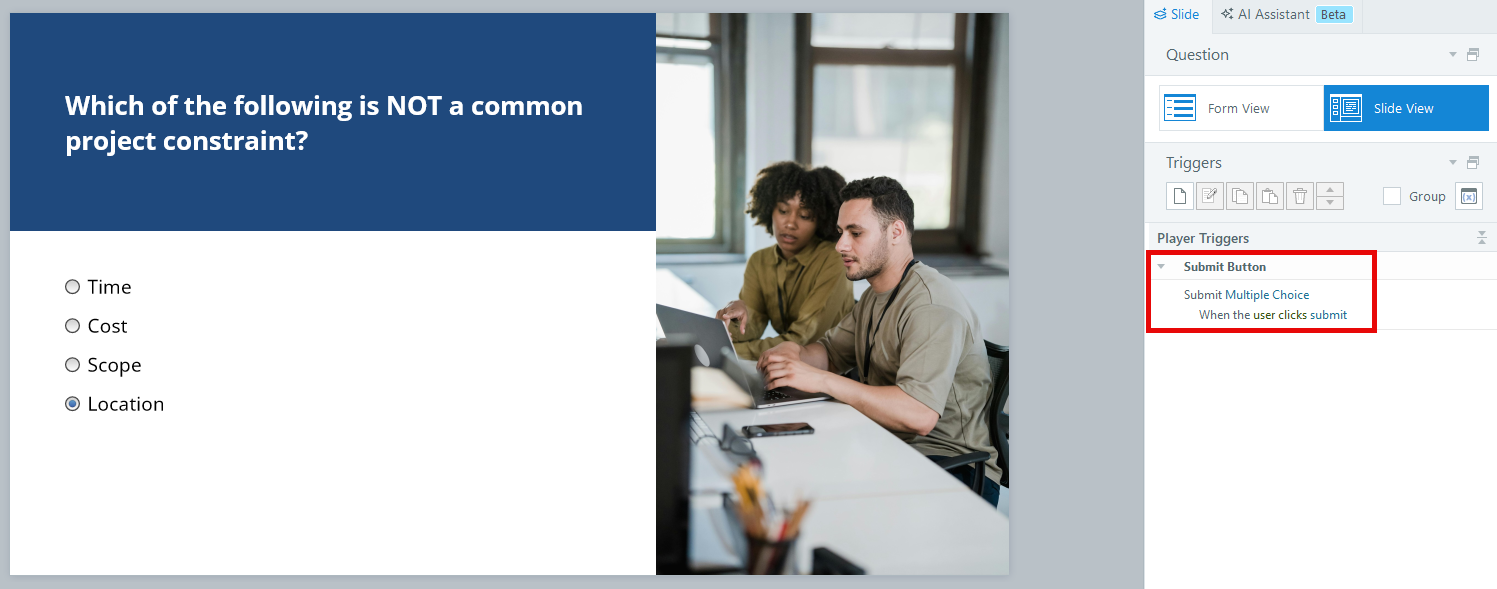 Once again, by using the built-in Player and submission trigger for quiz questions, you’re making your course more accessible!
Step 5: Interactions
The Accessibility Checker alerts you to any interactions that aren’t accessible, such as a form-based Matching Drag-and-Drop question. However, because Storyline allows you to design highly customized slides, the checker won’t necessarily recognize if you’ve built an inaccessible interaction.
To ensure a smooth experience for everyone, avoid:
- Custom drag-and-drops that can’t be navigated using a keyboard
- Vision-dependent interactions or quiz questions that require a learner to analyze a graphic without sufficient alt text (such as, “What’s wrong with this picture?”)
- Over-complicated interactions where the learner can get “lost” and not be able to return to their original location (like in cases where you have layers built upon layers)
Tip: Check out Articulate’s webinar on Creating Accessible Drag-and-Drop Interactions to take your development skills to the next level!
Summary
There’s no doubt that the Accessibility Checker has transformed how we develop in Storyline, but it’s important to remember it isn’t a catch-all. While it highlights the technical details, your expertise is what ensures the final product is intuitive and accessible. By combining Articulate’s automated tools with a human touch, you’ll ensure your content is genuinely ready for all learners.
Now, Here Are Some Additional Resources!
If you’re ready to dive deeper into this topic, we’ve hand-picked a few of our favorite resources from Articulate, The Articulate Trainer blog, and our website to help you on your journey:
Accessible E-Learning Tutorials
ADA Compliance Requirements: What Do I Need to Know?
Beginner’s Guide to NVDA and Storyline for Accessibility Testing
Create More Inclusive E-Learning with the Storyline 360 Accessibility Checker: Webinar Highlights
Elevate Your E-Learning by Prioritizing Accessibility and Usability
How Do I Create an E-Learning Accessibility Checklist?
How To Test Your E-Learning Course with a Screen Reader
What is Focus Order in Accessible e-Learning?
Using the Storyline 360 Accessibility Checker Webinar
Virtual Creating Accessible E-Learning in Articulate 360 Training
Happy accessible developing!

~ Raye
Leave a Reply